Silent Hill 2 Blue Creek Apartments guide
Here’s how to navigate the Blue Creek Apartments in Silent Hill 2.


At this point in Silent Hill 2, you will have explored the foggy East South Vale and made your way through the Wood Side Apartments, where you’ll have fended off Mannequins and more while finding all manner of keys and coins. The good and bad news is that there’s more of that to come, so keep your Wooden Plank close and prepare for more puzzles.
Blue Creek Apartments is where we’re headed next, and the dilapidated former-homes have definitely seen better days. To help you out, here’s our Silent Hill 2 Blue Creek Apartments guide.
Silent Hill 2 Blue Creek Apartments guide
After entering Blue Creek Apartments in Silent Hill 2, go down the following hallway to retrieve the map for the area. If you then continue down the hall, you’ll soon find a wall that you can break with your Wooden Plank, granting you access to Room 206.
Go through Room 206 to reach Room 204, and continue through the blue door in the room.
Next, advance through the hallway and enter Room 212. Along the way, you may notice that Room 202 has the letter ‘M’ carved into it.

In Room 212, you’ll find another save checkpoint. Interact with the cloaked clock in here to reveal the Grandfather Clock puzzle. You’ll also find a drawing on the wall beside it, showing some arrows labeled with names, and another note on the table that consists of a poem — shown below — involving these names.
Henry fears Scott, he’ll run from him and hide,
He’s fled to the west, to the other side.
But here comes Mildred, with unknown intent,
Scott lies face down, blind to her descent.
Ultimately, we’re going to be collecting different clock hands to place in this clock. Using the poem and the drawing on the wall, we then need to determine where each clock hand should face. The arrows on the drawing help massively, but you’ll need to rely on the poem otherwise.
The solution to this puzzle is the same regardless of what puzzle difficulty you’re playing on, but how much information you gain from the drawing on the wall will be different. I recommend attempting to solve the puzzle now and making a note of it, so that you need not wrack your brain with the puzzle three times in a row.
If you’re uncertain, the Grandfather Clock puzzle solution is as follows:
- Henry/Hour Hand should point at 9.
- Mildred/Minute Hand should point at 2.
- Scott/Second Hand should point at 3.
With that solution established, go ahead and enter Room 203. As you approach the TV, the lights will go out and you’ll need to fight a Mannequin. Then, break the wall in this room to enter Room 205.
In Room 205, you can jump out of the window to reach outside again. Go up the stairs and climb into the building to find yourself in Room 305. Once again, break the kitchen wall in here and exit into the hallway.
Move the shelf in this hallway to create a shortcut. You will then find that Room 306 is locked, so go ahead and enter Room 307, which contains a radio chained to the ceiling. Of course, this radio has one of our clock hands in it, and there’s a pipe in here that is missing a valve.

Exit via the red door in here to find yourself outside again, and then jump into Room 205 once more. This time, the door will lock behind you, but you’ll also happen upon the Room 306 Key on the table. Turn the valve in the room and you can then exit.
Return to Room 306, using the key to unlock it. You can then crawl through the gap in the bottom of the lounge wall and enter Room 304. Here, there is another red valve to turn. Afterwards, interact with the red valve again to add it to your inventory.

Return to Room 307 and attach the valve to the pipe, then turn it. The radio will come crashing down from the ceiling and you can retrieve the Hour Hand. The door that the chains were previously attached to is now open, so go through it to reach outside.
Outside, pull the lever to reveal some stairs and make another shortcut. Then, return to Room 212 to attach the Hour Hand to the clock, positioned to point at 9.
After doing this, Room 210 — which has the letter ‘H’ on the door — is now open. Go inside, and beside the TV, you’ll see a seesaw contraption that is missing two figurines.

Break the wall in the kitchen to access the bathroom of Room 210, and then search the toilet here to retrieve the Minute Hand for the clock. Exit via the bathroom door and you’ll now find that the environment has changed a little, but there will be a Pigeon Statue to collect on the bookshelves just in front of the bathroom door.
Enter Room 209 next and break the bathroom shower screen to collect the Malformed Figurine. Next, go to Room 211 to retrieve the Swan Head from the corner of the room. Combine this with the Malformed Figurine to have a functioning, Malformed Swan Statue.
Return to the seesaw contraption in Room 210 and place the Pigeon Statue on the left-hand side. Then place the Malformed Swan Statue on the right-hand side, in the second slot from the left. The seesaw will then collapse and break, revealing the Winged Key.
Use the Winged Key on the locked door in this room and then jump down to 1F. Pay a visit to Room 109 for another cutscene with Angela.
Following the cutscene with Angela, you’ll acquire Angela’s Knife and the Key of Resilience.
- Angela’s Knife can influence the ending of your game depending on how many times you examine it in your inventory. Play as you would normally, but bear this in mind.
Use the Key of Resilience to unlock the double doors west of Room 111. You’ll see a door marked with the letter ‘S’ along the hall here, but we can’t enter the room just yet.
Return to Room 212 and place the Minute Hand in the clock, positioned to point at 2. Then, head to Room 209 — the room labeled ‘M’ that we walked past earlier — to come to another puzzle: the Moth Room.
In the Moth Room, you need to add together all of the symbols that are displayed on the various moths to give you a code for the locked door in the room. These are skulls, circles, and crescents, though some of the moths are missing their wings. Only count the symbols visible to you.
You’ll also find that by peering through the hole in the kitchen wall, there are more moths to count than you first think. Break the wall in the lounge and follow the small room round until you come to a shelf you can move. Move it to reveal another moth whose symbols need counting.
Once you have added all the symbols up, the end result you should have is five circles, eight crescents, and three skulls. Now, interact with the locked door in the room to find that you have to input a code.
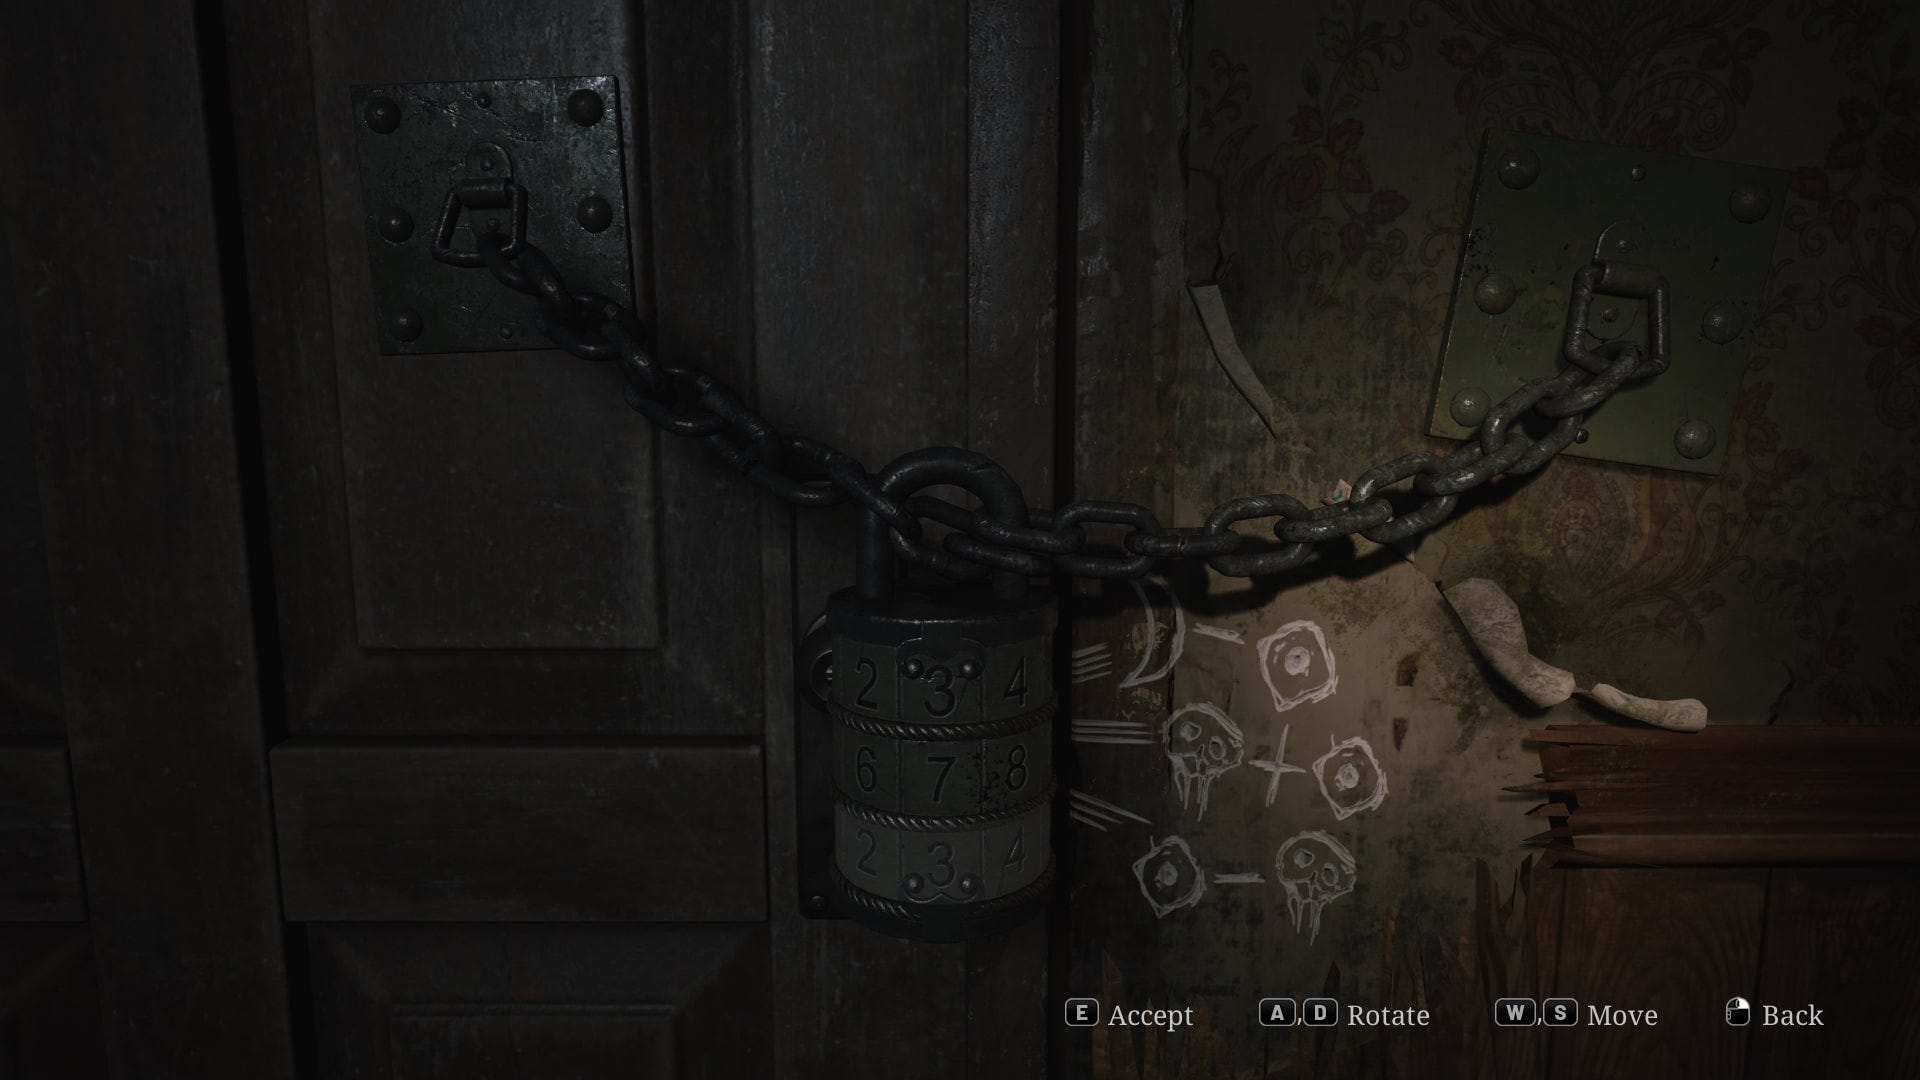
Depending on your puzzle difficulty, which code you input can vary.
- Light puzzle solution: Simply input your findings, 582.
- Standard puzzle solution: By the lock, there’ll be sums involving the symbols to solve that’ll give you the code of 373.
- Hard puzzle solution: By the lock, there will be some more complex sums involving the symbol to solve. These give you the code of 522.
Following the puzzle, enter the next room and shove James’ hand in yet another grisly hole to retrieve the Second Hand. Then, return to Room 212 and position the hand so it is pointed at 3.
We can now enter the room labeled ‘S’ on 1F that we walked past earlier. As you enter, you’ll be meeting the Red Pyramid Thing that Eddie briefly mentioned earlier…
Following the cutscene, your first boss fight will ensue. Fortunately, this is a timed sequence, so you can save your hard-earned handgun ammunition and simply run circles around the room until the sirens begin to blare. Shooting Pyramid Head will slow him down, but there’s really no point in using up your ammo here.
There’s also multiple medical supplies in the room, depending on your combat difficulty, so go ahead and grab these while you’re at it.

Once the siren begins blaring, Pyramid Head will stop and avert his attention away from James before exiting the building.
Follow him through this door after the cutscene to find another save checkpoint, and then begin making your way towards Rosewater Park on your map. You’ll run into Laura along the way.
To continue our Silent Hill 2 walkthrough, here’s our Rosewater Park and West South Vale guide.
For more on Silent Hill 2, take a look at our spoiler-free review of the remake.