MW3: Precious Cargo weapon and item locations
We’ve rounded up the locations of every item and weapon you can find in Precious Cargo, the first Open Combat Mission in Modern Warfare 3.
The Modern Warfare 3 campaign introduces an interesting style of mission that you have not quite seen before in any other Call of Duty. They’re called Open Combat Missions, and they give you freedom to approach the different situations in a way that suits you.
But that starts with finding the right tool for the job, which goes for more than just weapons. Each Open Combat Mission has a set number of items - which include weapons, and Field Upgrades. These are placed all over the map. While you do not have to hunt for each and every one of them, it can be fun trying to find them all before you set off.
In this guide we’ll cover the best ways of finding them on your own, and offer a detailed list (and map) of their locations if you want to skip the work.
MW3 Precious Cargo weapon/item list
Precious Cargo is the first Open Combat Mission. It has a total of 21 weapons and items in Supply Boxes. As with all Open Combat Missions, you can consult your map to see how many you have discovered/have left.
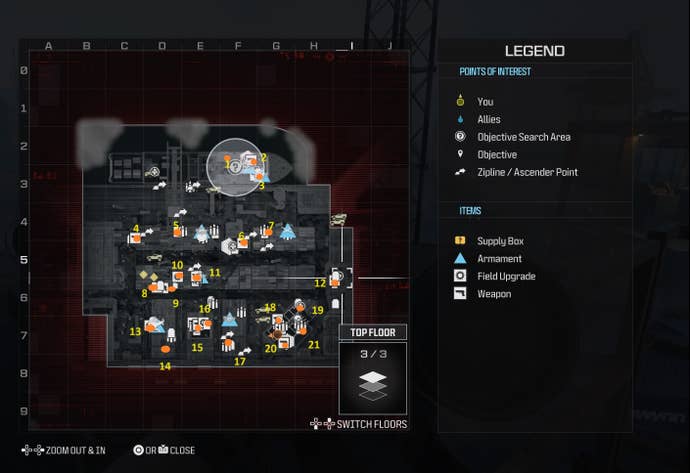
The numbers next to each one in the list below matters, because that’s how you’re going to find them on the map. Pay attention to the grid lines, too, as we’ll often use them to make it easier to locate something.
- RGL-80 - Grenade Launcher.
- Incendiary Bryson 800 - Shotgun.
- KVD Enforcer - Sniper Rifle.
- GS Magna - Pistol/Handgun.
- BAS-B - Assault Rifle.
- Hybrid STB-556 - Assault Rifle.
- Signal 50 - Sniper Rifle.
- MTZ-556 - Assault Rifle.
- Silenced WSP Swarm - SMG.
- Recon Drone - Field Upgrade.
- Silenced Rival-9 - SMG.
- Silenced ISO Hemlock - Assault Rifle.
- Heartbeat Sensor - Field Upgrade.
- Silenced Expedite 12 - Shotgun.
- Snapshot Pulse - Field Upgrade.
- 556 Icarus - LMG.
- PILA - Rocket Launcher.
- RPK - LMG.
- Explosive Victus XMR - Sniper Rifle.
- Pulemyot 762 - LMG.
- Munitions Box - Field Upgrade.
MW3 Precious Cargo weapon/item location
MW3 Precious Cargo Ascender, Parachute, Plate Carrier Upgrade locations
Consulting the same map, you’ll find the Ascender and the Parachute in the building of your first objective - where you need to go to pick up the tags. Your first Plate Carrier Upgrade can be found in grid D 7, and the second one on top of a container in grid G 6.
As a reminder, those items are everywhere, and you may well run into them naturally, meaning they are not just found at the locations outlined here.
.jpg?width=690&quality=70&format=jpg&auto=webp)
How to locate hidden weapons/items in MW3 Open Combat Mission
The Supply Boxes can be very hidden in MW3’s Open Combat Missions. The best way to check a bunch of their locations off the list is to pull out your scope (up on the Dpad by default), and simply look around.
This will not only help you find areas that are suspiciously marked, the scope also has an auto-spotting ability which highlights more than enemies. It permanently tags ziplines, and boxes of useful items like armor/killstreaks etc. But the big one is that if you locate an orange Supply Box in your scope, its location will be permanently tagged on your map, as well as in the 3D space.
It’s hard to miss those orange Supply Boxes, they tend to stand out. However, if you know you’re in the area but can’t quite find what you’re looking for, listen for the chime! Much like chests in Destiny and Warzone, MW3 Supply Boxes send out a chime that gets louder the closer you get. So listen in and follow the sound.
What you need to find in every MW3 Open Combat Mission
Open Combat Missions in MW3 give you a lot of room to create and execute your own tactics, but you don’t always start the mission with the tools that let you navigate the world effectively. There are three crucial items, and you may not always spawn with any of them.
These are the Ascender, Parachute, and two versions of the armor plate carrier. The Ascender is the tool you use to travel on ziplines - whether vertical or horizontal. The Parachute, well, that’s self explanatory. The two are the most useful when hunting Supply Boxes, but also to efficiently navigate around the map. Finally, while you start with a one-plate armor vest, you can find one that ups that to two, and another that gets you the maximum of three.
It is worth noting, however, that while they’re going to make your life easier, they are not necessary. Most buildings have multiple ways of reaching their upper floor, be it stairs, ladders, or good old stacked boxes. An Ascender is going to save you time, but it’s not a requirement.
The other thing to keep in mind is that finding what you’re missing on the map is incredibly easy. Unlike Supply Boxes, those tools are everywhere, and spawn in multiple places. Simply heading to any building close to your spawn will quickly award you at least one. In many cases, they’re all right there next to one another.
Finally, if your goal is to find everything, simply ignore all objectives and take your time to discover the map. Finishing objectives can trigger certain events or cause reinforcements to be called in. You’ll have to put up with characters barking orders at you every so often, but that’s about it. Whatever you do, do not attempt the final objective as it will lead directly into a cutscene and prevent you from being able to go back and search for what you’re missing.
