Fallout: London Hear Ye, Hear Ye Quest - How to get all four leaders' signatures
Looking to enter the Palace of Westminster and continue your journey in Fallout: London? You will need a signature from each borough first. Here’s how to get them.


As you progress with the main quest in Fallout: London and eventually wind up in the borough of Westminster, where things are slightly rosier and less ruined than the rest of London, your next goal will be accessing the Palace of Westminster. Of course, these folk aren’t going to let you walk right in, and you will need signatures from the leaders of all four London boroughs to be let inside.
This means that you have your work cut out for you completing busy work for factions across London if you hope to enter the Palace of Westminster. Or you can snoop around and forge all of their signatures instead. The choice is yours! To help you get inside the Palace, here’s our Hear Ye Hear Ye quest walkthrough, and how to get all four leader’s signatures in Fallout: London.
Fallout: London Hear Ye, Hear Ye Quest - How to get all four leader’s signatures
The Hear Ye, Hear Ye quest kicks off after the Lay of the Land quest, which sees you finding a Calling Card from Smythe that directs you to the Palace of Westminster. So, what are you waiting for? Head on over there and speak to the Parliament Guard by the gates.
After speaking with the Parliament Guard — who is guarding the area we need to visit next if we wish to get closer to Smythe — you’ll discover that you sadly can’t just waltz into the Palace.
Instead, you can pay off the Parliament Guard using 700 Tickets (or 500 with the Charisma stat), and he’ll tell you how to gain entry to the prestigious building; you must collect the signatures of the leaders of each of the four eligible boroughs in London. These are Camden, Hackney, Islington, and Lambeth, and other boroughs and their leaders do not count towards this quest.

Alternatively, the Guard says you can also chat with someone known as Clifford, who can be found on Bridge Street in Westminster, sitting outside Emilio’s Caffe. If you speak with him, he will offer to forge the signatures needed in exchange for Tickets, if you can provide him with any kind of handwriting from the borough’s leaders.
His prices start at 100 Tickets and get more expensive the more signatures that you ask him to forge. You can also ask him to forge just the one signature, or all four, which is great if there are some factions you’d rather not hang out with for very long.
Anyways, let’s start retrieving these signatures.
How to get the leader of Lambeth’s signature in Fallout: London - No Man’s Wasteland
We’re going to start by paying a visit to Lambeth’s Leader in Fallout: London; this is Chief Roach, and he’s found in the middle of Brickton, south of the map of London.
In order to sign your petition, he asks that you deal with his altercations with the Tommies. They’re asking him to pay taxes, and, well, he doesn’t want to. Fair enough, mate, I can get behind that.

First up, you will need to speak to Lieutenant Doyle just outside of the Bricktonian’s compound. Then, venture into West Croydon Underground Station using the nearby steel bridges.

Along the way, you’ll be tasked with building a new bridge using 20 Steel, 50 Wood, and 10 Screws. You can use materials you’ve already collected, explore the nearby Croydon Pindar — after a quick visit to the Crystal Palace Maze to fetch the door code — to get them, or use console commands to spawn them into your inventory.
If you are going to do the latter, here are all the Item ID’s you need for the command console (which is opened using the tilde key):
- Wood: player.additem 000731a3 50
- Steel: player.additem 000731a4 20
- Screws: player.additem 00069081 10
Either way, once the bridge is built, venture into the following Underground Station — via the crashed train — and help defend the Tommies from the Gehenna beast.

This creature stomps a lot so keep your distance, and if you’ve got Mad Jack as a companion, he fortunately tanks a lot of the Gehenna’s aggression.

Speak to Second Lieutenant Buckley about the fight, and then continue through to the exit of the Station. When you exit, the skip in front of you will contain a Support Beam; grab this, as we’re going to need it.

Follow your quest marker to the end of the next bridge. Here, you’ll need the Support Beam we just collected, 20 Steel, 50 Wood, and 10 Screws again to build another bridge to Croydon. Once that’s done, venture into Croydon and speak with Reece.

After having made contact with the Croydonians, you can return to Second Lieutenant Buckley within the Station; she will thank you, and provide you with a Written Commendation. Then, return to and speak to Lieutenant Doyle once more to have him vow to stop taxing the Bricktonians.
Last, but not least, return to Chief Roach and tell him the news. He will pay you 300 Tickets for your help, and provide a signature for your petition.

If you’d rather forge Chief Roach’s signature, look around at the wooden shacks near his camp for a skull on an altar; there will be a letter inside of it for you to take to Clifford in Westminster.
Next, we’re going to Islington.
How to get the leader of Islington’s signature in Fallout: London - Glad Tidings
In Islington, you’ll meet Miller at Islington Charter House; the notorious bloke behind Miller’s Men in Fallout: London. Like Chief Roach, he won’t sign our petition until we help him pay off a ‘life debt’ first.

This life debt involves John Marsh, an inhabitant at St. Paul’s Cathedral in London, which you will have visited during earlier quests such as Fidei Dispensor and Cold Case. So, leave Islington and pay the man a visit.

When you meet John, it’s apparent that he is unwell, and the only debt he wishes for Miller to take care of is his wife. And by take care of, I mean kill, because she has unfortunately become a ghoul and John wishes for her soul to be at rest.

Once you’re done with John, make your way to London City Airport — where his wife, Jane Marsh, reportedly is — which is to the very east of the map of London. Once inside, you’ll have to clear out plenty of Ghouls.
You can then go upstairs and use the Terminal to open a nearby security gate. Go back down the stairs and through the gate to find who we came here for, Jane Marsh, in a horrible, glowing ghoulish form.

When she reaches half-health, she’ll flee through one of the vents in the room. Exit the room and go through the red double-doors directly across from them to come to a room with security gates.

Pick lock the door to the small office and access the Terminal in here to open another security gate in this room. Go through the gate and voila, you will find Jane Marsh crawling out from one of the vents again. Kill her, and that’s your job for John Marsh completed.
Now, return to John Marsh at St. Paul’s Cathedral. He sadly won’t have made it, so head to the graveyard, pay your respects, and then finally return to Miller in Islington and let him know you’ve sorted out his life debt.
He’ll sign our petition as a result, and give us 2500 Tickets for the trouble. Nice.

If, for whatever reason, you don’t fancy doing Miller’s dirty work or accidentally aggravate him, there’s a hidden set of shelves beside the red sofa in the area. Interact with the lever next to the sofa to reveal it. Here, you’ll find a letter from Miller that Clifford, back in Westminster, can use to forge his signature.
Up next, we’re visiting the people of Hackney!
How to get the leader of Hackney’s signature in Fallout: London
In Fallout: London’s Hackney, you want to pay a visit to The Shoppe, which is where Roundels spend time lording over their scooters.

Upstairs of the building, you can speak with Prince Pete Davies, who will initially refuse to sign the petition outright, unless you have 10 Charisma.
You can get 10 Charisma by chugging various Chems, such as Wonderland and Excalibur, and this will let you bribe Pete; he will sign the petition under the impression that you’ll provide his next fix. Voila!

That said, if you don’t have 10 Charisma or the Chems to get you there, and Pete has refused to sign your petition, hang around for a bit. You’ll soon be prompted to speak with Mike or Dennis from the group; if you speak to Mike, a quest to get Pete clean will commence, and he’ll happily sign your petition afterwards.

Alternatively, look around Pete’s room. There’s a letter on top of the dresser with a television on it that you can take back to Clifford in Westminster, which will allow him to forge Pete’s signature.
Last, but not least, it’s time to visit Camden.
How to get the leader of Camden’s signature in Fallout: London - Here’s the Pistols
Now, if you thought your job was nearly done, I’m sorry to say that your time in Fallout: London’s Camden consists of multiple side quests and a lot of busywork. Let’s get started.
First things first, you can reach Camden via Euston Station. Along this route, you will eventually wind up in Mornington Crescent Underground Station, before finally exiting in Camden.

Once you’re finally in Camden, you want to head to the north of the borough to find a bar known as Cyberfox. Downstairs, you can meet the leader of the Pistols, Apache Alice, who will only sign your petition if you’re one of their members.
Fortunately, she agrees to make you a member if you can take care of some hooligans for her, which starts the Here’s the Pistols side quest. What she fails to mention is the fact that you need three endorsements from three different NPCs after this, which can take some time, so let’s get going.

First things first, you want to go to Arlington School in Camden to clear out the hooligans for Apache. Once they’ve been dealt with, return to Apache again and speak to her about endorsements. She’ll advise that you speak with Captain Reasonable and Palmira Romero.

Next, head to the Catacombs in Camden and speak with Palmira, who will tell you about a problem with the water supply. This starts the Water Woes side quest.

After this, speak to Polly Ester at the nearby Water Treatment Plant. She’ll advise that the water supply is poor, with radiation levels growing; offer to help identify the issue and two new quest markers will be added to your map.

The two new quest markers will point out the source of the radiation. Once you arrive at either, a Glowing One will spawn for you to defeat, but both areas are full of Hooligans as well, so make sure you’re prepared.
After dealing with both irradiated ghouls, return to Polly Ester and advise that the problem has been solved. Then, return to Palmira in the Catacombs to receive some tickets and your endorsement.

Next, we’re visiting Captain Reasonable who is found in a food hall near Camden Market. He’ll task you with retrieving a weapon stash from Lewisham Police Station, which is quite the trek away.
To get there, fast-travel out of Camden and to central London. You’ll then see that Lewisham is southeast of the map. To get there, I fast traveled to the Crash Site and walked southeast until I reached Greenwich Checkpoint, which was defunct. To the left of the checkpoint, however, there’s a gap in the wall you can go through.
After this, keep following your quest marker to reach Lewisham Checkpoint, and pass on through to finally be in the area. As you enter Lewisham, an NPC called Bookie will approach with a challenge; you have to do the challenge then and there or it’ll result in a fight, as I learnt the hard way. RIP Bookie.
Once you’re done with Bookie, follow your quest marker and enter Lewisham Police Station. Now, there are a lot of hooligans to defeat here, and plenty of loot. That said, if you want to grab the gun stash and get out of here, the stash is found directly above the entrance to the building.

From the entrance, go left, and left again through the silver door. Go upstairs, go right through a brown door, and go right again to reach the office with the gun stash. Retrieve it, and you can then jump through the hole in the floor to reach the entrance to the building again.

Now, make your way back to Captain Reasonable in Camden to deliver the stash. He’ll give you an endorsement for your work, as well as The Clash weapon, which is quite nice of him.
Next, return to Apache in the basement of Cyberfox and she’ll inform you about your third and final endorsement: John Strutter. This fella is also located in the Catacombs where Palmira was, so return there.

Knock on the door to John’s room repeatedly until he answers. Tell him Apache sent you, and he will let you in. It turns out he’s been implicated in crimes he did not commit by someone called Malcolm Rhodes, and he asks that you have him sign a confession or that you find some sort of document that proves Malcolm is lying.
Malcolm is found in the Two Westminster Chairmen pub back in Westminster, and initially (for me, anyway), he was in a locked room. Entertain yourself for a minute or two and Malcolm will leave; talk to him.

Here, you can use Charisma, Strength, or the Scholar Perk to con him into signing the confession. I used Strength, and Malcolm signed the confession right away, being very stroppy about it while doing so. If the diplomatic approach doesn't work, you can carefully break into Rhodes' room and then his safe to retrieve some documents which will do the trick.
With the confession signed, return to John. If you opted to use Strength to get the confession like I did, do not tell John the truth about your actions; he will become upset and the quest will fail. If you lie to him, however, he’ll have his doubts but you will get your endorsement.
Finally, return to Apache Alice with all three endorsements. She will officially make you a member of the Pistols and give you keys to your very own Camden abode. Speak to her again about signing the petition, and she will do so.
When it comes to forging Apache’s signature with Clifford, I am not entirely sure, right now, where you can steal a document from her. That said, with high enough Intelligence, you can trick her — at the start of the quest — into giving you an autograph, and this will suffice for our petition.

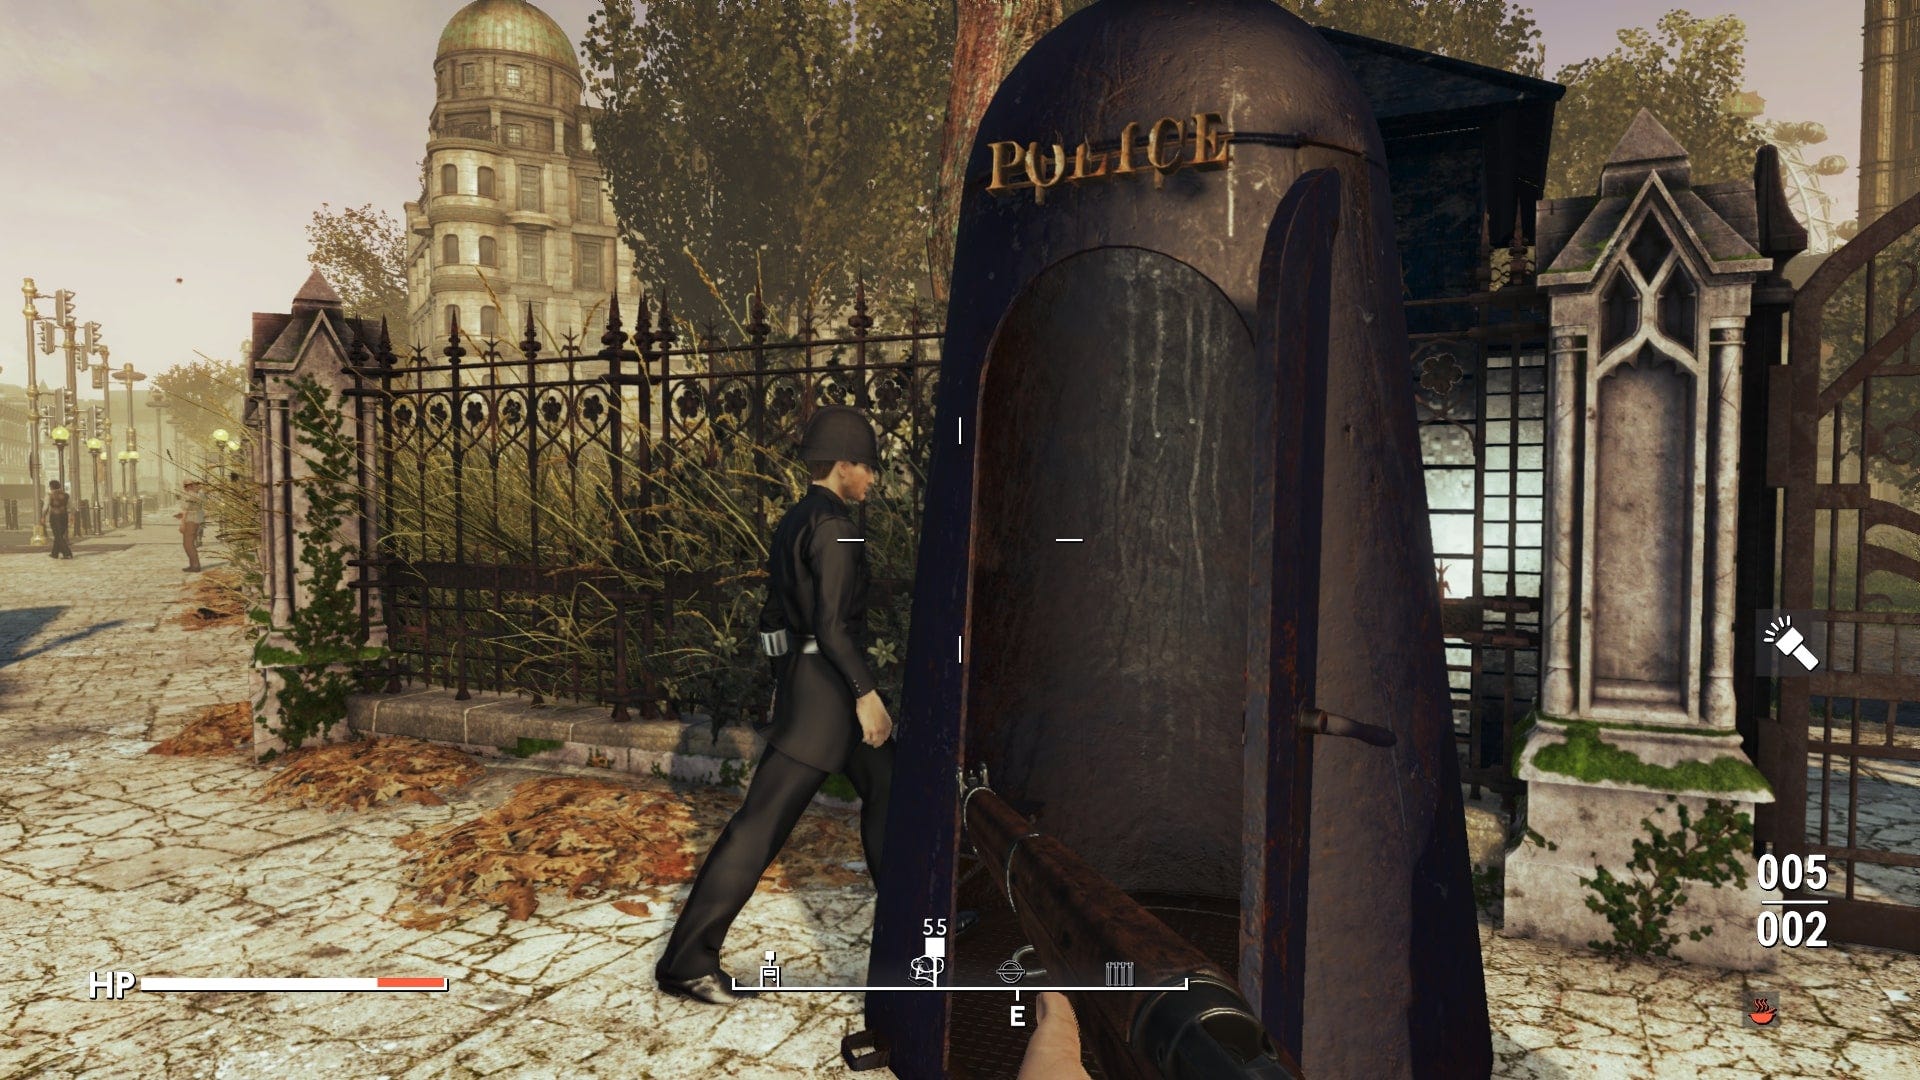
Now, you can head back to the Parliament Guard in Westminster with your petition full of signatures. Except, the Parliament Guard who was ever so kind to us earlier has now been replaced by two more much more sinister looking guards.

They accept your petition, and will tell you to take the 'discreet' entrance into the palace via a phone box on Bridge Street. Go and do just that, and as you ride the phone box down beneath London, the Hear Ye, Hear Ye quest will be completed.
Soon, you’ll kick off the All To Pot quest.
For more on Fallout: London, take a look at our guide to all Factions to see who you haven’t met yet, how to get all Companions, and what the best Perks are.