GTA 5 PC guide: how to use the Rockstar Editor & Director Mode
GTA 5 on PC comes with an exclusive editing suite - here's a detailed overview of how to use it to create custom movies and soundtracks using all in-game assets.
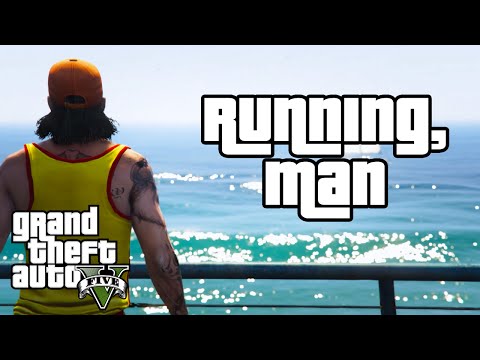
Want to make movies as cool as this one by 8 Bit Bastard? Of course you do. Which is why you're going to need to get to grips with the Rockstar Editor, which comes as part of GTA 5 on PC.
GETTING STARTED
Initially it can seem overwhelming with such a large amount of options, but be aware that content unlocks as you play through the single-player game. With that in mind, let's start with the basics of the Rockstar Editor, and how to manipulate the tools to your advantage.
There are two distinct modes here; Rockstar Editor and Director Mode. Rockstar Editor is your basic mode for capturing and editing gameplay footage, which you can then manipulate.
Director Mode is for creating more elaborate scenes. With this mode you can manipulate characters, weather, animals, dialogue, gestures and real-time effects.
We've split this guide into pages, so you can jump forward to specific tasks should you need to.
- Editing clips and using Markers
- Adding audio and text
- Previewing, saving and exporting your project
- Director Mode, casting and shortlists
- Uploading to YouTube
- All Rockstar Editor and Director Mode controls
CAPTURING GAMEPLAY
First up, you need to capture some gameplay. There are two ways of doing this: Manual Recording and Action Replay.
Once you've recorded footage you will then have access to different camera angles while editing. There may be some restrictions to camera angles, but if so you'll see an icon on screen.
Manual Recording - Hold ALT and press F1
This is a simple button press to record footage. Hold ALT and press F1 for Manual Recording, and let the camera roll. Gameplay will be recorded in the background until you press LEFT ALT and choose ‘Save Recording’ [F1] or ‘Cancel Recording’ [F3].
Action Replay - F2
This option records gameplay footage after the fact. Hit F2 to buffer recorded data in the background, but note it will not record anything until you hit ALT and F1 to 'Save Action Replay'.
Recorded clips will be between 30 and 90s seconds in length, depending on how busy your action is. You will be notified if you are running out of space on your hard drive and you can define the amount of hard drive space you use for the Rockstar Editor by going to Pause Menu > Settings > Rockstar Editor.
Next page - using the menu to begin editing your saved clips together.
What you really want to do now is create something as cool as the video below. With time and patience and some learned skills you can.
ROCKSTAR EDITOR MAIN MENU
Now you have some gameplay footage recorded and saved, you're going to want to get to work. Take a look at the main menu in the Rockstar Editor and you'll see the following options:
- Create New Project - Creates a brand new project from clips that have been recorded.
- Load Project - Load and work on a previously saved project.
- Director Mode - One of the access points for launching Director Mode.
- Clip Management - Preview and manage your recorded clips.
- Video Gallery - Where your exported videos are available for viewing and uploading to YouTube and the Rockstar Games Social Club.
Choose 'Create New Project' and 'Add Clip' to select the footage you want to use. Recordings will be placed in a timeline, and you can move around each clip using LEFT CTRL and X or click and dragging them. Delete a clip using DEL, duplicate a clip with LEFT CTRL and C, or use the mouse wheel to scroll through the timeline.
Now double click on a clip or press ENTER to begin editing it.
EDITING CLIPS
Markers
Editing video clips is done using Markers, which can be placed anywhere within your clip. You can change camera angles, effects, speed etc using these. You can scrub through the clip footage using the left and right arrows or your mouse wheel. Press M on the timeline where you want to begin editing and you'll be presented with the following options menu:
- Standard Marker - Standard Markers allow you to define every possible editing variable. They are grey when placed and white when being edited.
- Anchor Marker - Anchor Markers allow you to mark a specific point in a clip where you can later add text and/or audio to that position back on the Timeline. They are dark yellow when placed and pale yellow when being edited. The only variable that can be edited for an Anchor Marker is its position.
- Combined Marker - Combined Markers allow you to define every possible editing variable and serve as an Anchor Marker as well, for referencing specific points for positioning items
back on the Timeline. Just like Standard Markers, they are grey when placed and white when being edited.
Cameras
You cannot change camera angle for any clips that have been captured in first-person mode. If there are any other camera restrictions, you'll see a notification on screen. Aside from that, you're generally free to toy with three different camera settings.
- Game Camera – This is your default third-person camera view filmed from behind the main character.
- Pre-set Camera angles – These are simple pres-set camera angles that lock the view at the front, behind, sides or above the main character. You can zoom in an out from these.
- Free Camera – with Free Camera you can place the camera within a defined area but freely around your main character. Don't try and get too cocky with this, but experiment. You can lock the camera in position to create a smooth panning effect.
Effects
Like Snapmatic photos, you can apply various effects to your clips and play with saturation etc. Less is more. You can also experiment with depth of field and set the focus on a particular character. You have to be running Direct X 11, and have Post FX set at 'Very High' or 'Ultra' settings to manipulate depth of field.
Audio
With the audio option to can change soundtrack, dialogue and sound effect volumes and tweak the score to increase volume and intensity during dramatic moments.
Speed
Speed up or slow down the clip for dramatic or comedic effect.
Navigation and Thumbnails
This is very handy - you can capture a particular thumbnail image to help identify a certain clip. Really, really useful when editing multiple clips together.
When you've added all of your Markers you can save changes with F5 and press ESC to go back to your timeline. You can now switch between your Timeline and the Project Main Menu using ESC. Now you've ordered and edited your clips together, it's time to add music and audio options.
Next - editing audio and adding text
AUDIO
You can now add music to your edit. From the Project Main Menu select Add Radio Track or Add Score Track to get your desired piece of music. Score Tracks have different levels of intensity that you can experiment with.
Place the audio on the timeline using CURSOR to move the play head and LEFT MOUSE BUTTON or LEFT CTRL and V to place. You can synch the music using the Skip the Beat function and shorten it if it's too long. You can use multiple musical tracks here but each must be at least 30 seconds long.
MIRCOPHONE TYPE
You can experiment with different settings here that are self-explanatory but do change the overall clip audio significantly: default microphone, cinematic microphone, microphone positioned at the camera or microphone positioned at the target. Listen to all of these options and you'll notice a real difference to the clip.
ADD TEXT
At the Project Main Menu you can add text to your edit and tweak size, position, font, colour, opacity and duration.
On to previewing, saving and exporting your project
PREVIEW
Okay, it's almost showtime. From the Project Main Menu go to Full Screen Preview and check out your work so far in all its glory. You can double check you're happy with everything before you export your project.
SAVE PROJECT
From the Project Main Menu click on Save Project to change the name of the movie and/or save different versions of it. As you're working through your movie you should be pressing F5 or using Save to make sure you save your work as you go.
Important! If you uninstall the game at any point you'll also delete all rendered videos in the Rockstar Editor. Clip and project data will be safe, so you still have the basic data but you'll have to start again with it.
EXPORTING YOUR PROJECT
You're almost done. Now you just need to export your video using the Export option on the Project Main Menu. Here you can set frame rate and bit rate. The exporting process is not representative of your final video so don't worry that there's no audio and it takes longer than the length of your movie - this is part of the process. The video will now appear in the Video Gallery inside the Rockstar Editor main menu. From here you can view it and upload it to either YouTube or the Rockstar Social club.
We recommend making at least one video to get used to the process before moving on to the more ambitious Director Mode.
DIRECTOR MODE
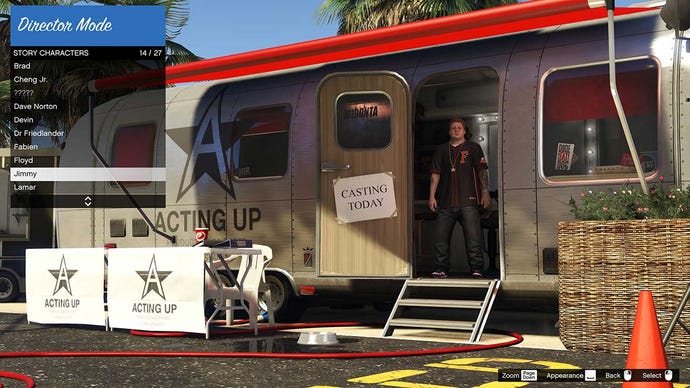
Director Mode is where you get really creative. Here you can chose from a cast of GTA 5 characters and animals, manipulate them and their surroundings. You can trigger moods, actions and dialogue, and take control over weather, time and locations in Los Santos.
STARTING DIRECTOR MODE
You will need to be playing GTA 5 Story Mode, on foot and without a Wanted Level. From here you can pause the game and select Director Mode from the Rockstar Editor tab, or press M and select it.
CASTING
This is where you choose the stars of the show. On the Actors menu you can choose characters and this is tied to your progress in Story Mode. Some characters will have access to the vehicles and weapons you've unlocked in Story Mode, although some have certain restrictions which are noted clearly. Some may not be able to use certain items, for example. You will spawn characters at the last location you were in before you entered Director Mode. Press ENTER to select your character of choice.
You can randomise the character by using the Appearance option on the character/animal and pressing SPACE. This changes colour, hair style, accessories, facial hair and other options.
SHORTLIST
You can store 10 different characters in a list on the Director Mode menu for easy access. This saves you from cycling through the Casting Trailer options again. Very handy.
The key point to remember in Director Mode is that your casting choices are tied to your progress in the Story Mode. The more you play and unlock, the more you have to play with in Director Mode.
SETTINGS
This menu is self-explanatory but let's take a look at it. It's here you can change and manipulate time of day, weather, wanted status, vehicle and pedestrian density. These are all crucial to the look and feel of your movie so give them as much attention as your cast.
Next: Uploading your video to youTube and Rockstar Social Club.
UPLOAD TO YOUTUBE
You're now ready to show off your creation, and it's all relatively straight forward.
You can upload to YouTube from the Video Gallery. If your settings are either Public or Unlisted it will also be uploaded to the Rockstar Social Club. You can set these options in the Rockstar Editor tab on the Settings menu.
You need all the basic YouTube requirements: you must have it linked to your Rockstar Social Club ID, YouTube accounts must be verified if your video is longer than 15 minutes, video cannot be someone else's work renamed, etc.
And that's it! Show us what you've got!
Next page: all the controls for the Rockstar Editor and Director Mode
ROCKSTAR EDITOR AND DIRECTOR MODE CONTROLS
DIRECTOR MODE
Director Mode Menu - M
Speech - L Ctrl
Action - Caps
ROCKSTAR EDITOR: RECORDING
Start Recording - F1
Stop Recording - F1
Cancel Recording - F3
Turn on Action Replay - F2
Save Action Replay - F1
Turn Off Action Replay - F3
ROCKSTAR EDITOR: TIMELINE
Switch between Timeline & Menu - ESC / Right Mouse
Control Playhead - Mouse wheel
Navigate Timeline - WSAD / Cursor Keys
Pick Up a Clip - L Ctrl + X / Drag Left Mouse
Place a Clip - L Ctrl + V / Enter / Left Mouse
Duplicate a Clip - L Ctrl + C
Edit a Clip - Enter / Left Mouse
Delete a Clip - DEL
Trim Audio or Text Start - Hold Q
Trim Audio or Text End - Hold E
Trim Clip Manually - [ / ]
Snap Trim Audio Clip - Cursor Left / Cursor Right
Preview Audio Clip - Space
Stop Audio Clip Preview - Space
ROCKSTAR EDITOR: CLIP EDIT MODE
Play Clip - Space
Pause Clip - Space
Cycle Markers - [ / ]
Add Marker - M
Select Marker - Enter / Left Mouse
Delete Marker - DEL
Move Marker - Drag Left Mouse
Scrub - Mouse Wheel
Scrub Fine - Cursor Left / Right
Hide HUD - H
Save - F5
ROCKSTAR EDITOR: EDIT FREE CAMERA
Move - WSAD
Rotate - Hold Left Mouse
Height - Q / E / Mouse Wheel
Zoom - Z / C
Roll - Cursor Left / Right
Reset Camera - L Ctrl
Save - F5
ROCKSTAR EDITOR: EDIT FREE CAMERA WITH ‘LOOK AT TARGET’
Orbit Target - WSAD
Offset Target - Hold Left Mouse
Move In / Out - Cursor Up / Down
Height - Q / E / Mouse Wheel
Zoom - Z / C
Roll - Cursor Left / Right
Reset Camera - L Ctrl
ROCKSTAR EDITOR: EDIT PRESET CAMERA
Move In / Out - Cursor Up / Down
Zoom - Z / C
Reset Camera - L Ctrl


